
Spring is in the air and Easter is on its way! Here is a super-easy way to create some Easter Button Art to hang on your wall. If you select a neutral frame, you can create a new piece of art for every season and reuse the same frame.
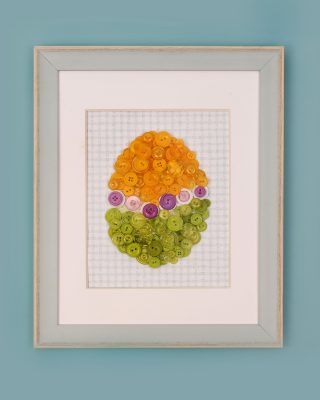
For this Easter Button Art project, I used buttons in a range of bright pastel colors, as well as a frame filled with a decorative background paper. You can choose your own colors and patterns if you like; just be sure that whatever you use for the background doesn’t clash with the buttons. Bright and cheerful colors on the egg combined with softer neutrals for the background are usually a good bet.
To create this Easter Button Art project you will need the following supplies:
Buttons and Beads Cactus 100005814
Buttons and Beads Sun 100005812
Frame
Scrapbook Paper for the background
Scissors
Glue Gun
You will also need to print out an egg pattern to cut out. You can either trace the egg shape onto your background paper, or use the cutout as a stencil to guide your button placement—do whatever works best for you!
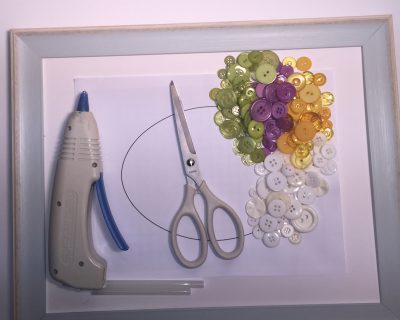
Next, start laying out your buttons in the desired pattern. You can create spots, stripes, or zigzags on your egg; let your creativity shine through!

Once you have a pattern that you’re happy with, start gluing the buttons onto the background. Be sure to be careful when working with hot glue. Once all your buttons are glued down, remove any excess glue from the buttons and assemble the frame.
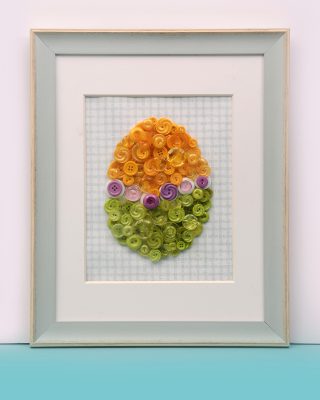
Congratulations! You have a beautiful piece of button art that you can use to decorate your home or office space. Use buttons to add a seasonal flair to your décor this Easter and throughout the rest of the year. Stay tuned for more fun button craft projects!
HAPPY CRAFTING!